Re-introducing Paparazzi’s Accessibility Snapshots
Overview
As some of you may know, Paparazzi is an open source snapshot testing library allowing you to render your Android screens without a physical device or emulator. A feature of Paparazzi that may be less well known is its ability to take accessibility snapshots. While this feature has existed for quite a while, Paparazzi’s accessibility snapshotting capabilities have expanded dramatically in recent months, so I wanted to dive into what accessibility snapshots are, how Paparazzi captures them and why you might want to use this tool to help improve the accessibility of your application.
Accessibility snapshots?
Accessibility snapshots provide a way to visually inspect the semantic accessibility properties applied to each element of your view under test. Similar to Paparazzi’s regular snapshots, this allows you to create baseline images and verify any future changes against them to ensure that no regressions occur to your app’s accessibility support.
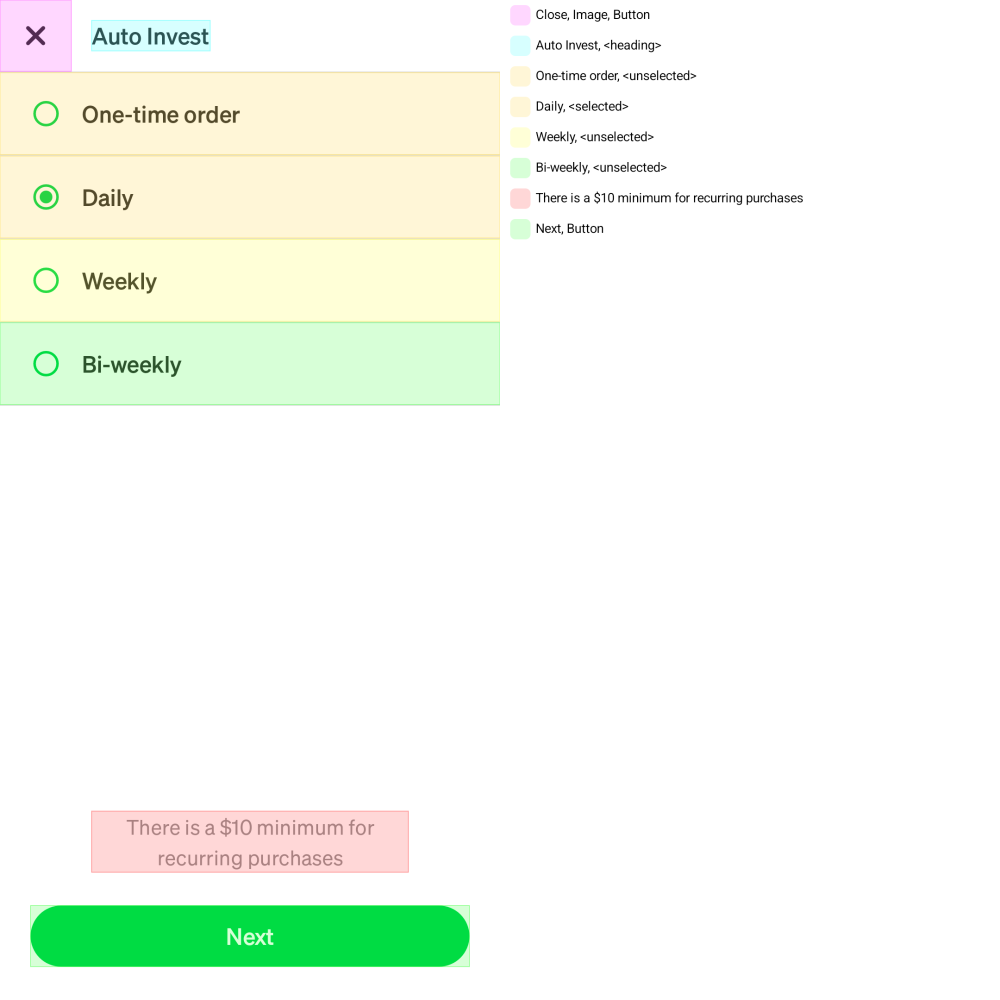
As shown in the example snapshot image below, a legend is drawn on the right side where each UI element is mapped (via colour coding) to its accessibility properties. These properties are what would be read out by screen readers your customers might use (i.e. TalkBack).
Paparazzi’s AccessibilityRenderExtension
Paparazzi creates accessibility snapshots through the use of the AccessibilityRenderExtension. The AccessibilityRenderExtension works by iterating over the View tree or SemanticsNode tree, for legacy Android views and Compose UI respectively. On each element, the accessibility semantics are extracted to display them in the legend that will be drawn alongside the UI snapshot. Additionally, the layout bounds of each element are captured to create the coloured boxes that map the elements in the UI to the text in the legend.
To create an accessibility snapshot test, the only change needed compared to a regular Paparazzi test is to add the AccessibilityRenderExtension to the renderExtensions set in your Paparazzi configuration, as follows:
@get:Rule
val paparazzi = Paparazzi(
    // ...
    renderExtensions = setOf(AccessibilityRenderExtension()),
    // ...
)
Recording and verifying accessibility snapshot tests works identically to regular Paparazzi tests.
Interpreting accessibility snapshots
While Paparazzi’s accessibility snapshots provide valuable information, you cannot rely on these screenshots alone to determine UI accessibility compliance. The snapshots require careful interpretation to verify that the set properties match your screen’s expectations, and should be used as one of several tools in a comprehensive accessibility testing strategy. When interpreting the accessibility snapshots, the top things you should look for are that all of the visually available context (e.g. text, icons that convey meaning) in the UI snapshot are represented in the legend, that elements that relate to each are grouped together (e.g. content in a row is represented as single item in the legend) and that the correct role or state is represented for each element (button, header, selected, disabled, etc). The Paparazzi docs have some additional content explaining in more detail how to ensure your UI is accessible.
Conclusion
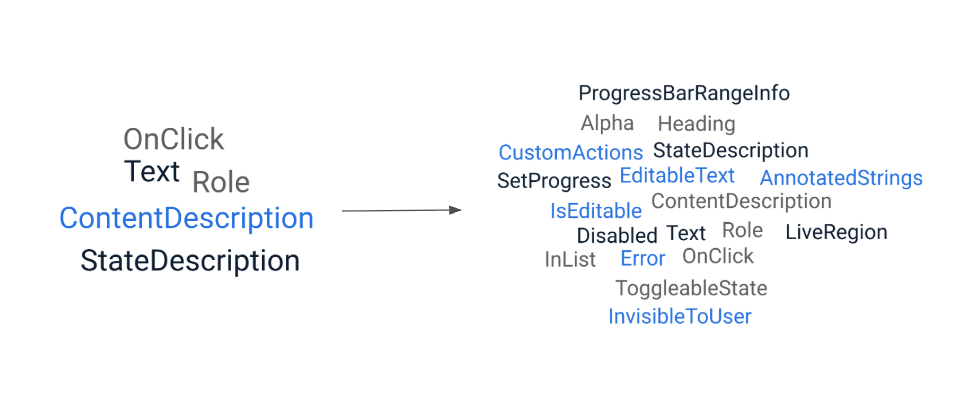
As I mentioned at the start of this blog post, the capabilities of the AccessibilityRenderExtension have grown dramatically in recent months. Shown above is the big increase in supported semantic properties we have had (14 new properties!), many of which came from open source community feature requests!
I want to end off this blog post by encouraging anyone reading to try out Paparazzi’s accessibility snapshots in your projects! The Paparazzi docs and Github repo are great places to check out if you want any additional help getting started or if you find any issues or feature requests you would like to submit!